Handy commands

If you start getting tired of typing the same command over and over again, the alias command is for you.
For example if you want to connect to your pi through ssh you have to type

ssh pi@[my_name].duckdns.org

You can shorten this significantly by using the alias command:

alias mypi='ssh pi@[my_name].duckdns.org'

After this, you only have to type

mypi

to connect to your pi over SSH. Like this you can create all kinds of shortcuts.

These commands are active during your session, if you want to make the persistent, you need to add the command to .bashrc

vi ~/.bashrc

Installing web tools

With a limited amount of participants we decided to install some web tools to practice the installation.

Paste

We start with paste. The installation instruction can be found at privatebin.info It forwards you to the GitHub page of the project. Since we have installed Apache with PHP7, it seems we are ok with our server.

So we start by downloading the latest version of the the software to you www root (/var/www/html in our case) using:

sudo wget https://github.com/PrivateBin/PrivateBin/archive/refs/tags/1.4.0.tar.gz

Than extract it using tar:

sudo tar xzvf 1.4.0.tar.gz

and rename the directory to something you like (like paste):

sudo mv PrivateBin-1.4.0/ paste/

Now you just need to set the correct access rights to the directory to the webserver user:

sudo chown -R www-data:www-data paste/

You can not go to your browser and open the tool: https://pepopi.duckdns.org/paste

Dokuwiki

Another nice tool to run on your server is Dokuwiki. It is a file based wiki for your documentation needs. Like the paste solution the setup is pretty straight forward. First download the latest version in the www root:

wget https://download.dokuwiki.org/src/dokuwiki/dokuwiki-stable.tgz

Then extract the file, rename the directory and make the webserver owner of the directory:

tar xzvf dokuwiki-stable.tgz
mv dokuwiki-2020-07-29/ dokuwiki/
sudo chown -R www-data:www-data dokuwiki/

Now you can access the wiki and create your documentation at: https://pepopi.duckdns.org/dokuwiki/

WordPress CMS

Another good to have tool is a CMS for easy website creation. WordPress is a popular option. So let’s use that for this installation.
The start of the installation is pretty similar the the previous two tools. Download the latest version, extract it, move it to the correct directory and set the permissions right:

sudo wget https://wordpress.org/latest.tar.gz
sudo tar xzvf latest.tar.gz
sudo chown -R www-data:www-data wordpress/

After this you need to create a database and a database user to store the website data in.

sudo mysql
# create a user
create user 'wordpress'@'localhost' identified by '<password>';
# create a database
create datebase wordpress;
# Grant the user access to the database
grant all privileges on wordpress.* to 'wordpress'@'localhost';
# Make sure it works
FLUSH PRIVILEGES;


Now you can start the initial setup of wordpress by going to https://pepopi.duckdns.org/wordpress/ and fill in the form.
According to above created settings:
Database: wordpress
Username: wordpress
Password: <password>
Database Host: localhost
Table Prefix: wp_

Then fill in the form on how you want to name the website.

Trouble shooting

PHP Upload limit

After playing around with the WordPress installation we ran into a few issues while trying to upload a theme. This is partly due to the very modest default PHP settings. In the php.ini file enlarge the upload_max_filesize value to 16M:

sudo vi /etc/php/7.3/apache2/php.ini
# safe and restart apache2
sudo systemctl restart apache2

In the recording I ran into an issue due to my reverse proxy. It also had a maximum filesize. After I disabled that in the nginx settings the upload did work.
This is the documentation I kept from that setting:

Fix upload limit for servers behind proxy

Put the following code in /etc/nginx/nginx.conf at the bottom of the http context. Source

http {
    ...
    client_max_body_size 0;
}

FTP upload

To get rid of the FTP upload information put the following line in the wp-config.php file

define('FS_METHOD','direct');


Install a VPN server

A VPN server is a useful tool to have access to. For example to browse saver on a public hot spot or access services that are geo-restricted.

OpenVPN and Wireguard are a few good options. In this lesson we will start with OpenVPN.

Installing OpenVPN

The easiest way to install OpenVPN on a Raspberry Pi is to run the script mentioned on this website: https://raspberrytips.com/openvpn-raspberry-pi/

wget https://raw.githubusercontent.com/angristan/openvpn-install/master/openvpn-install.sh -O openvpn-install.sh

And then run it:

sudo bash openvpn-install.sh

You should know you local IP address and when the script asks for you external IP address, please use your duckdns name, so it is automatically updated. For the rest you can keep the defaults.

Once the script is done you have created an .ovpn config which you need to connect to your VPN server. Copy this to you local machine (a simple trick is to use the cat command, copy the output and put it in a text document on you local machine.

Open a port in your firewall

Before you can test your installed VPN server you need to open port 1194 UDP in your firewall. This is similar as discussed earlier with the SSH and web server.

Install OpenVPN client

Ubuntu

Ubuntu has build-in support for OpenVPN. On older version you might need to run the following install to be able to set every up in the GUI.

sudo apt install network-manager-openvpn 
  • Open the network settings
  • In the VPN section click the + sign
  • Pick the ‘Import from file’ section
  • Open the .ovpn file
  • Connect to the VPN

OSX

  • Download and install the client from the official website
  • Use the .ovpn file to setup the client
  • Connect to your VPN

Windows

  • Download and install the client from the official website
  • Use the .ovpn file to setup the client.
  • Connect to your VPN.

Adding/removing clients

After your initial tests, you might want to add a few more clients, like for you phone, your laptop or a friends device. This can be very easily done by rerunning the script and pick the right option.

sudo ./openvpn-install.sh

Be sure to not send these configs in plane text over the internet. So maybe the next thing we want to do is create our own paste-bin service.

Installing a LAMP server

In an earlier lesson we have installed an Apache web server. This is nice for serving static pages, but hardly any website consists only of static pages, so that is where a LAMP server comes in. LAMP is an abbreviation for Linux, Apache, MySQL/MariaDB, PHP/Python/Perl. So, the OS, the web server, the database and the scripting language.

OK, let’s get started: Before installing software, it is good practice to make sure the Pi is up to date:

sudo apt update && sudo apt upgrade -y

Since we already installed Apache2, we can continue with PHP. At the moment of writing version 7.4 is the main version and version 8.1 is out as well. We’ll stick to version 7 for now:

sudo apt install php libapache2-mod-php -y

To check if the installation went well, we create our first php page with the use of the echo command, so no need for an editor this time:

sudo echo "<?php phpinfo ();?>" > /var/www/html/info.php

Now, open your web browser and go to: https://[yourname].duckdns.org/info.php and you should see a large page with a lot of information about your web server.
This information is also interesting for potential hackers, so once you are done with it, it is good practice to remove the file again.

Next step is to install MariaDB, the open source version of MySQL, then we have to restart apache and we’ll secure the database server:

sudo apt install mariadb-server php-mysql -y
sudo systemctl reload apache2
sudo mysql_secure_installation

You will be asked enter current password for root (default is blank): press Enter.
Set root password, type Y and press Enter.
Type in a new password and press Enter. Important: remember this root password. (So put the password in your password manager!)
Re-enter the new password and press Enter.
Type Y and press Enter to Remove anonymous users.
Type Y and press Enter to Disallow root login remotely.
Type Y and press Enter to Remove test database and access to it.
Type Y and press Enter to Reload privilege tables now.
When complete, you will see the message All done! and Thanks for using MariaDB!.

Some basic commands that you will have to use to create a database and grant privileges:

sudo mysql -uroot -p

* create database YOURDATABASENAME;
* GRANT ALL PRIVILEGES ON YOURDATABASENAME.* TO 'root'@'localhost' IDENTIFIED BY 'YOURROOTPASSWORD';
* FLUSH PRIVILEGES;
* EXIT

As a bonus we’ll install phpmyadmin, a web frontend to administer your database:

sudo apt install phpmyadmin -y

Select Apache2 with the cursor keys and press the spacebar to highlight Apache2 > Tab > Enter.

Configure database for phpmyadmin with dbconfig-common? Select ‘No’ > Enter, we have already setup a database above with the MySQL installation.

To access phpmyadmin browse to https://[yourname].duckdns.org/phpmyadmin/ Username: root and [yourpassword]

Source:
https://www.instructables.com/Installing-LAMP-Linux-Apache-MySQL-PHP-on-a-Raspbe/

Securing the server

In the introduction to the course day we talked about the process so far and what would need to be done more to get a full server.
The students came up with the following list:

  • Securing SSH (disable password login)
  • Securing Apache (installing an SSL certificate)
  • Get a real SSL certificate from Let’s Encrypt and automatically update it.
  • Install a full web server with PHP and database support

The three security related topics will be discussed in this post. The ‘LAMP-installation’ will follow in the next post.

SSH remove password:

Login with SSH to your server, this should not ask for a password, as we have setup public-key authentication.

Use your favorite editor to edit the sshd_config file

sudo vi /etc/ssh/sshd_config

Find the following line:

PasswordAuthentication yes

And change it to:

PasswordAuthentication no

If there is a # at the beginning of that line, remove that #. An # sign comments out a line, so it is not used.

Save the file restart the SSH service using this command:

sudo systemctl restart ssh

Check in a separate terminal if you can still login to the Pi using SSH.
If all went well, you have secured SSH on you Pi.

HTTPS:

To create a secure webserver you need to enable SSL in your webserver software. In this example we use Apache.

First we need to to create a SSL certificate we will use. For this, we create a folder to save these certificates in:

sudo mkdir /etc/apache2/ssl

sudo openssl req -x509 -nodes -days 1095 -newkey rsa:2048 -out /etc/apache2/ssl/server.crt -keyout /etc/apache2/ssl/server.key

Fill in the form that start, you can also press enter on every option to accept the default, as we will shortly replace these values with the Let’s Encrypt certificates.
Then enable the SSL module using the following command:

sudo a2enmod ssl

Then you need to setup the correct settings in de configuration file and enable the SSL site by creating a symbolic link . We change the two lines relative to SSLCertificate as follow :

SSLCertificateFile    /etc/apache2/ssl/server.crt
SSLCertificateKeyFile /etc/apache2/ssl/server.key
sudo nano /etc/apache2/sites-available/default-ssl.conf

sudo ln -s /etc/apache2/sites-available/default-ssl.conf /etc/apache2/sites-enabled/000-default-ssl.conf

Lastly restart apache servers:

sudo systemctl restart apache2

You can navigate in a browser to your secure website: https://[yourname].duckdns.org

You will notice you get a warning about the certificate we have just created. By default self signed certificates are not considered safe, as the creator of the certificate cannot be verified. To fix that we’ll get to the next part:

LET’S ENCRYPT Certificate
Let’s Encrypt is an organization that allows you to create a valid certificate. It is valid for 3 months, to not have to manually update this every 3 months a script will be enabled to do this for us.

First we need to install a few packages:

sudo apt install certbot python3-certbot-apache

Certbot is looking for a few specific directives in the configuration file, so we make sure they are there: (Make sure to replace [your_domain] in this command!)

sudo vi /etc/apache2/sites-available/[your_domain].conf

and edit the following lines to match your domain name ([yourname].duckdns.org)

...
ServerName your_domain
#ServerAlias www.your_domain ## Optional
...

Test your configuretion and if you get a Syntax OK you can restart Apache2:

sudo apache2ctl configtest

sudo systemctl reload apache2

Now we can generate the actual certificates:

sudo certbot --apache

Fill in the questions asked by the script and let it generate they certificates (Choose 2: Redirect if asked)
Once done you can go to your website to check if it all worked as expected.

The last thing we do is check if the auto renew of the certificate works. I has been setup as a cron job by copying a script to /etc/cron.d when certbot was installed.

Check if the service is available and you can do a dry run:

sudo systemctl status certbot.timer

sudo certbot renew --dry-run

Your apache server is ready foor https access.

Used sources:

  • https://linuxhandbook.com/ssh-disable-password-authentication/
  • https://hallard.me/enable-ssl-for-apache-server-in-5-minutes/
  • https://www.digitalocean.com/community/tutorials/how-to-secure-apache-with-let-s-encrypt-on-ubuntu-20-04

File locations

Before we continue it is good to get a bit of background information on which files you can expect to find at which part of the file system:

/The root directory, where everything begins.
/binContains binaries (programs) that must be present for the system to boot and run.
/bootContains the Linux kernel, initial RAM disk image (for drivers needed at boot time), and the boot loader. Interesting files include /boot/ grub/grub.conf, or menu.lst, which is used to configure the boot loader, and /boot/vmlinuz (or something similar), the Linux kernel.
/devThis is a special directory that contains device nodes. “Everything is a file” also applies to devices. Here is where the kernel maintains a list of all the devices it understands.
/etcThe /etc directory contains all the system-wide configuration files. It also contains a collection of shell scripts that start each of the system services at boot time. Everything in this directory should be readable text. While everything in /etc is interesting, here are some all-time
favorites: /etc/crontab, a file that defines when automated jobs will run; /etc/fstab, a table of storage devices and their associated mount points; and /etc/passwd, a list of the user accounts.
/homeIn normal configurations, each user is given a directory in /home. Ordinary users can write files only in their home directories. This limitation protects the system from errant user activity.
/libContains shared library files used by the core system programs. These are similar to dynamic link libraries (DLLs) in Windows.
/lost+foundEach formatted partition or device using a Linux file system, such as ext3, will have this directory. It is used in the case of a partial recovery from a file system corruption event. Unless something really bad has happened to your system, this directory will remain empty.
/mediaOn modern Linux systems, the /media directory will contain the mount points for removable media such as USB drives, CD-ROMs, and so on, that are mounted automatically at insertion.
/mntOn older Linux systems, the /mnt directory contains mount points for removable devices that have been mounted manually.
/optThe /opt directory is used to install “optional” software. This is mainly used to hold commercial software products that might be installed on the system.
/procThe /proc directory is special. It’s not a real file system in the sense of files stored on your hard drive. Rather, it is a virtual file system maintained by the Linux kernel. The “files” it contains are peepholes into the kernel itself. The files are readable and will give you a picture of how the kernel sees your computer.
/rootThis is the home directory for the root account.
/sbinThis directory contains “system” binaries. These are programs that perform vital system tasks that are generally reserved for the superuser.
/tmpThe /tmp directory is intended for the storage of temporary, transient files created by various programs. Some configurations cause this directory to be emptied each time the system is rebooted.
/usrThe /usr directory tree is likely the largest one on a Linux system. It contains all the programs and support files used by regular users.
/usr/bin/usr/bin contains the executable programs installed by your Linux distribution. It is not uncommon for this directory to hold thousands of programs.
/usr/libThe shared libraries for the programs in /usr/bin.
/usr/localThe /usr/local tree is where programs that are not included with your distribution but are intended for system-wide use are installed. Programs compiled from source code are normally installed in /usr/local/bin. On a newly installed Linux system, this tree exists, but it will be empty until the system administrator puts something in it.
/usr/sbinContains more system administration programs.
/usr/share/usr/share contains all the shared data used by programs in /usr/bin. This includes things such as default configuration files, icons, screen backgrounds, sound files, and so on.
/usr/share/docMost packages installed on the system will include some kind of documentation. In /usr/share/doc, we will find documentation files organized by package.
/varWith the exception of /tmp and /home, the directories we have looked at so far remain relatively static; that is, their contents don’t change. The /var directory tree is where data that is likely to change is stored. Various databases, spool files, user mail, and so forth, are located here.
/var/log/var/log contains log files, records of various system activity. These are important and should be monitored from time to time. The most useful ones are /var/log/messages and /var/log/syslog. Note that for security reasons on some systems, you must be the superuser to view log files.
/var/wwwDefault location for webpages

(From The Linux Command Line, 2nd Edition by William Shotts.)

IP addresses

Networked computers communicate with each other through IP addresses. To avoid problems they have to be unique. You can compare an email address to a physical address (country.city.street.house number), but as computers in essence only understand binary number, so a 0 or a 1, the addresses are build up with zeros and ones.

An IPv4 address is basically an 32 bit address that for convenience is broken up in 4 groups of 8, (by eight, or byte). Binary works with level of two, that can be added. As in daily life we are used to the decimal system 0-9 these bytes can be converted to a decimal number according to the following table:

Power of 22726252423222120
Decimal1286432168421

If all the bits are set/on, you add the powers of 2, so for an 8 bit number like one octet in an IP address, 11111111, would result in: 27 + 2 6 + 2 5 + 2 4 + 2 3 + 2 2 + 2 1 + 2 0 = 255. Similar, 11000000 would result in 27 + 2 6 = 192
As mentioned, an IP address is made u of 4 of the octets of binary numbers, so 11000000.10101000.00000001.00001010 would be 192.168.1.10 in decimal.

So, with the basics of how a computer sees an IP address, we only scratched part of the communication over IP, net to the IP address, you will need a subnet mask. In a home network this is 255.255.255.0 As you can see 24 of the 32 bits are set, so the subnet mask is also revered to as /24

The subnet mask tells you which part of the address in this network is fixed, so in a home network this would be the 192.168.1 part. The last octet can have values of 0-255. The first value in this range -in this case 0- is called the subnet address, and the last number in this range -in this case 255- is called the broadcast address. These addresses are reserved and cannot be used as an IP address on your network. At a later point we might dive into this a bit deeper.

For now the most important part to remember is that in a home network in general you work with an IP range 192.168.x.y with subnet mask 255.255.255.0 In most home routers x is set to 1, but it can have any value from 0-255. Most routers have IP address 192.168.x.1, the other 253 addresses can be used for other devices on this network.

For a home network this should be plenty for all the devices you have there. In a company you would likely need more address. This can be done by changing the subnet mask and/or the network class. But that is something to deal with later. I will just mention the 3 private network classes and the default IP ranges and subnet masks:

classIP rangeSubnet maskHosts
C192.168.0.1-192.168.0.254
192.168.255.1-192.168.255.254
255.255.255.0254
B172.16.0.1-172.16.255.254
172.31.0.1-172.31.255.254
255.255.0.065534
A10.0.0.1-10.255.255.254255.0.0.016777214

Install a webserver

After we have practiced installing packages and editing files it is time to do a bit more practical setup. Let’s start with a webserver. As this is Linux, you have the choice of which webserver you want to install. The two biggest once are Apache2 and NGINX, but there are others like lighttpd. For now we keep with the first two. Before you continue type the internal IP address of the RPi in your web browser and double check the outcome. After that login to your Pi and install Apache2:

sudo apt install apache2

After the install is done, you can go to your web browser and try the internet IP address again. You should see something like the picture at the start of the article.

So, next let’s make our own webpage. By default Apache stores the pages used for the website in /var/www/html, so let’s make our own page:

sudo vi /var/www/html/index.html

Clear everything that is in this file and put in the following:

<html>
 <head>
  <title>Hello word</title>
 </head>
 <body>
  <h1>Hello world! This is Peter</h1>
 </body>
</html>

After you save this code, you can go back to your web browser and check the result.

As an alternative you can install nginx. Please note: Don’t install Apache2 and Nginx at the same time unless you know what you are doing. As they use the same port and have the same purpose they should not be competing for attention.

sudo apt install nginx

You will get a similar default page that tells you nginx has been installed correctly. After that you can follow the steps described above to make your personal website.

If you want to learn more about HTML, CSS, PHP, JavaScript and other weblanguage -which by themselves are an entire rabbithole- you can check w3schools. They have been giving some of the best tutorials on weblanguages I have come across.

Change hostname

As the Raspberry Pi standard comes with the name raspberrypi, you might want to change this to something more descriptive so if you have more than one Pi in your network, you know which one is which.

The process in easy, you just have to edit one file and reboot your Raspberry Pi.

sudo vi /etc/hostname

Here you can practice your vi skills, or you can change vi in the command for nano. As you see, there is one line in this file that reads raspberrypi. Change this to what you want the pi to be named, and save the document. Then type:

sudo reboot

After a little wait, you can login to your RPi again and you will see the name change has taken effect.

Duckdns (part 2)

With the knowledge we have gained in the previous lessons, we’ll now setup a script to make sure the IP address of your internet connections is automatically updated to DuckDNS so you can also access your Raspberry Pi when your provider decides to change your IP address.

For this we found a nice article during the third online lesson, which can be found here.

The short version is as follows:

mkdir duckdns
cd duckdns
nano duck.sh

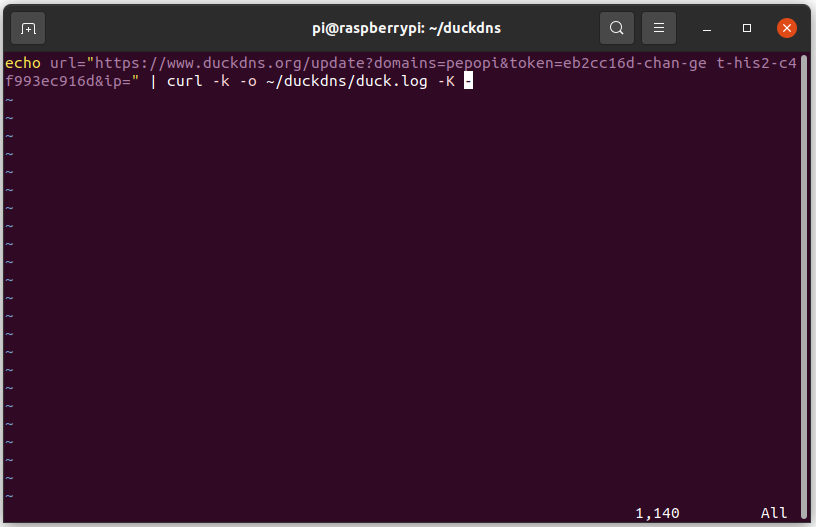
enter the following line and edit both the domain (the part you choose before .duckdns.org) and the token (which you can find when you log into DuckDNS at the top.)

echo url="https://www.duckdns.org/update?domains=[YOUR_DOMAIN]&token=[YOUR_TOKEN]&ip=" | curl -k -o ~/duckdns/duck.log -K -

Than change the access rights to the file and edit crontab, which is a job scheduler that in this case run the script we just made every 5 minutes.

chmod 700 duck.sh
crontab -e

Add the following line at the bottom

*/5 * * * * ~/duckdns/duck.sh >/dev/null 2>&1

Than test the script, check the log and start cron so from now on you will not have to remember to update your IP address.

./duck.sh
cat duck.log
sudo service cron start